Install Docker and Learn Basic Container Manipulations
Step 1: Install Docker and docker-compose System
Docker binaries are incorporated into RHEL/CentOS 7 extras repositories, the installation process being pretty simple.
- Install Docker package by issuing the following command with root privileges:
# yum update
# yum install epel-release && yum update

# yum install docker
# yum install -y python-pip
# pip install docker-compose
- After, Docker package has been installed, start the daemon, check its status and enable it system wide using the below commands:
# systemctl start docker
# systemctl enable docker
- Finally, run a container test image to verify if Docker works properly, by issuing the following command:
# docker run hello-world
If you can see the below message, then everything is in the right place.
"Hello from Docker. This message shows that your installation appears to be working correctly."
Now, you can run a few basic Docker commands to get some info about Docker:
# docker info→ For system-wide information on Docker# docker version→ For Docker version# docker→ To get a list of all available Docker commands type docker on your console.
Step 2: Download a Docker Image
In order to start and run a Docker container, first an image must be downloaded from Docker Hub on your host. Docker Hub offers a great deal of free images from its repositories.
- To search for a Docker image, Ubuntu for instance, issue the following command:
# docker search ubuntu
- After you decided on what image you want to run based on your needs, download it locally by running the below command (in this case an Ubuntu image is downloaded and used):
# docker pull ubuntu
- To list all the available Docker images on your host issue the following command:
# docker images
- If you don’t need a Docker image anymore and you want to remove it from the host issue the following command:
# docker rmi ubuntu
Step 3: Run a Docker Container
When you execute a command against an image you basically obtain a container. After the command that is executing into container ends, the container stops (you get a non-running or exited container). If you run another command into the same image again a new container is created and so on.
All the containers created will remain on the host filesystem until you choose to delete them by using the docker rm command.
- In order to create and run a container, you need to run a command into a downloaded image, in this case Ubuntu, so a basic command would be to display the distribution version file inside the container using cat command, as in the following example:
# docker run ubuntu cat /etc/issue
The above command is divided as follows:
# docker run [local image] [command to run into container]
- To run one of the containers again with the command that was executed to create it, first you must get the container ID (or the name automatically generated by Docker) by issuing the below command, which displays a list of the running and stopped (non-running) containers:
# docker ps -l
- Once the container ID has been obtained, you can start the container again with the command that was used to create it, by issuing the following command:
# docker start c629b7d70666
- In case the container is running state, you can get it’s ID by issuing docker ps command. To stop the running container issue docker stop command by specifying the container ID or auto-generated name.
# docker stop dreamy_mccarthy
# docker ps
- A more elegant alternative so you don’t have to remember the container ID would be to allocate a unique name for every container you create by using the –name option on command line, as in the following example:
# docker run --name myname ubuntu cat /etc/debian_version
- Then, using the name that you allocated for the container, you can manipulate container (start, stop, remove, top, stats) further just by addressing its name, as in the below examples:
# docker start myname
# docker stats myname
# docker top myname
Be aware that some of the above commands might display no output if the process of command that was used to create the container finishes. When the process that runs inside the container finishes, the container stops.
Step 4: Run an Interactive Session into a Container
In order to interactively connect into a container shell session, and run commands as you do on any other Linux session, you can go further like this:
- Issue the following command:
# docker run -it ubuntu bash
The above command is divided as follows:
-i is used to start an interactive session.-t allocates a tty and attaches stdin and stdout.ubuntu is the image that we used to create the container.bash (or /bin/bash) is the command that we are running inside the Ubuntu container.
- To quit and return to host from the running container session you must type exit command. The exit command terminates all the container processes and stops it.
# exit
If you’re interactively logged on container terminal prompt and you need to keep the container in running state but exit from the interactive session, you can quit the console and return to host terminal by pressing Ctrl+p and Ctrl+q keys.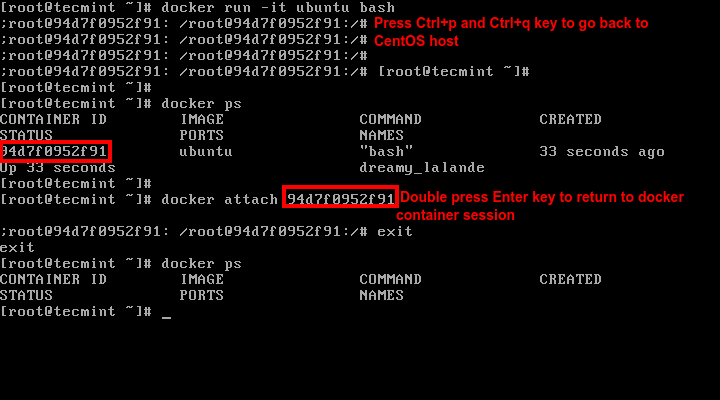
- To reconnect to the running container you need the container ID or name.
Issue docker ps command to get the ID or nameand,then, run docker attachcommand by specifying container ID or name, as illustrated in the image above:# docker attach <container id>
- To stop a running container from the host session issue the following command:
# docker kill <container id>
That’s all for basic container manipulation. In the other tutorial we will discuss how to save, delete and run a web server into a Docker container.