Nextcloud Server - RHEL / CentOS 8
NextCloud is an open source web suite that provides a cloud storage over the network, fork of ownCloud. It is like a Dropbox that permits you to store and share your documents and pictures in a centralized location.
Installation des Nextcloud Servers
Im nachfolgenden, werden alle für Nextcloud benötigten Pakete installiert, konfiguriert und gehärtet. Als nächstes, wird die für den Betrieb gebrauchte Datenbank erstellt, die Firewall-Rules sowie die benötigten SELinux Rules erstellt und aktiviert.
Zum Schluss der nachfolgenden Anleitung, sollte dann eine Sichere und vollkommen funktionstüchtige, neue Nextcloud Instanz realisiert sein!
Vorbereitungen
Hinzufügen des Epel und Remi Repositories sowie Installieren von paar Deps!
# yum -y install epel-release
# yum -y install https://rpms.remirepo.net/enterprise/remi-release-8.rpm

# yum update -y
# yum install -y vim wget curl setroubleshoot policycoreutils-python-utils setools yum-utils bzip2

# yum module reset php
# dnf module install php:remi-7.4
Installation und Konfiguration Pakete
Installation der Package-dependencies
# yum install httpd mariadb-server redis php-pecl-redis5 php-pecl-imagick php-intl php-common php-pecl-apcu php-fpm php-cli php-devel php-gd php-mysqlnd php-pear php-xml php-mbstring php-json php-pecl-apcu php-pecl-apcu-devel php-pecl-imagick-devel php-intl php-opcache php-zip php-bcmath php-process php-gmp php-pecl-selinux
Konfiguration des Webservers
Disable the pre-set Apache welcome page:# sed -i 's/^/#&/g' /etc/httpd/conf.d/welcome.conf
Prevent Apache from loading WebDAV modules, as required by NextCloud:# sed -i 's/^/#&/g' /etc/httpd/conf.modules.d/00-dav.conf
Change the web root directory:# sed -i 's/DocumentRoot "\/var\/www\/html"/DocumentRoot "\/var\/www\/html\/nextcloud"/' /etc/httpd/conf/httpd.conf
- Erstellen einer neuen HTTPD-Konfiguration unter:
/etc/httpd/conf.d/nextcloud.conf, für die spätere Nextcloud-Instanz:# vim /etc/httpd/conf.d/nextcloud.conf
Listen 7030

<VirtualHost *:7030>
    ServerAdmin michu@michu-it.com
    ServerName cloud.michu-it.com

    TimeOut 300
    ProxyTimeOut 300

    SetEnvIf X-Forwarded-Proto "^https$" HTTPS=on
    ServerSignature Off

    ErrorLog "/var/log/httpd/nextcloud-error_log"
    CustomLog "/var/log/httpd/nextcloud-access_log" combined

    DocumentRoot "/var/www/html/nextcloud"

    <Directory "/var/www/html/nextcloud">
        DirectoryIndex index.html index.php
        Options SymLinksifOwnerMatch
        AllowOverride All
       <IfModule mod_dav.c>
            Dav off
       </IfModule>
        SetEnv HOME /var/www/html/nextcloud
        SetEnv HTTP_HOME /var/www/html/nextcloud

        Require all granted
    </Directory>

    <IfModule reqtimeout_module>
        RequestReadTimeout body=0
    </IfModule>

    Header set X-Content-Type-Options: "nosniff"
    Header set X-Frame-Options: "sameorigin"
    Header always set Content-Security-Policy "connect-src 'self' analytics.michu-it.com:443"

</VirtualHost>
Erstellen der benötigten Ordner:
# mkdir /var/www/html/php_my_admin
# mkdir /var/www/html/nextcloud
Konfiguration von PHP
Next, open the PHP configuration file and increase the upload file size. You can find the location of the PHP configuration file by executing the following command:
# /usr/bin/php -i | grep 'Loaded Configuration File'
Loaded Configuration File => /etc/php.ini
In our case, we have to make changes to the /etc/php.ini file. We will increase the default upload limit to 3000 MB. You can set the values according to your needs. Run the following commands:
# sed -i "s/post_max_size = 8M/post_max_size = 6000M/" /etc/php.ini
# sed -i "s/upload_max_filesize = 2M/upload_max_filesize = 6000M/" /etc/php.ini

# sed -i "s/max_execution_time = .*/max_execution_time = 7200/" /etc/php.ini
# sed -i "s/max_input_time = .*/max_input_time = 7200/" /etc/php.ini
# sed -i "s/memory_limit = .*/memory_limit = 1024M/" /etc/php.ini

# sed -i "s/;listen.owner = nobody/listen.owner = apache/" /etc/php-fpm.d/www.conf
# sed -i "s/;listen.group = nobody/listen.group = apache/" /etc/php-fpm.d/www.conf
# sed -i "s/;listen.mode = 0660/listen.mode = 0660/" /etc/php-fpm.d/www.conf

# sed -i "s/pm.max_children = .*/pm.max_children = 120/" /etc/php-fpm.d/www.conf
# sed -i "s/pm.start_servers = .*/pm.start_servers = 12/" /etc/php-fpm.d/www.conf
# sed -i "s/pm.min_spare_servers = .*/pm.min_spare_servers = 6/" /etc/php-fpm.d/www.conf
# sed -i "s/pm.max_spare_servers = .*/pm.max_spare_servers = 18/" /etc/php-fpm.d/www.conf

# sed -i "s/;opcache.enable_cli=0/opcache.enable_cli=1/" /etc/php.d/10-opcache.ini
# sed -i "s/opcache.max_accelerated_files=4000/opcache.max_accelerated_files=10000/" /etc/php.d/10-opcache.ini
# sed -i "s/;opcache.revalidate_freq=2/opcache.revalidate_freq=1/" /etc/php.d/10-opcache.ini
# sed -i "s/;opcache.save_comments=1/opcache.save_comments=1/" /etc/php.d/10-opcache.ini
Ändern des PHP Default, upload-tmp Verzeichnisses.
Will man grössere Files unter CentOS hochladen, (grösser als das /tmp Verzeichnis), so muss der PHP upload-tmp Pfad an einen neuen Ort gesetzt werden, wo mehr Platz ist!
# mkdir /var/www/html/upload-tmp
# chown -R apache:apache /var/www/html/ && chmod 775 /var/www/html/upload-tmp/

# semanage fcontext -a -t httpd_sys_rw_content_t '/var/www/html/upload-tmp(/.*)?'
# restorecon -Rv '/var/www/html/'
# ls -lZ /var/www/html/

# sed -i "s/;upload_tmp_dir =/upload_tmp_dir = \/var\/www\/html\/upload-tmp/" /etc/php.ini
Starten / Enablen und Härten der Mariadb DB
Generieren eines neuen MaiaDB-Root Passwortes:
# openssl rand -base64 30 > /root/.mariadb-root-pw && cat /root/.mariadb-root-pw
Tb/qprITSryJDHEp29XHr7/IuxMxZhGke/LZXEEJ
# systemctl enable mariadb.service --now

# mysql_secure_installation
Enter current password for root (enter for none): Enter
Set root password? [Y/n]: Y
New password: ******************************
Re-enter new password: ******************************
Remove anonymous users? [Y/n]: Y
Disallow root login remotely? [Y/n]: Y
Remove test database and access to it? [Y/n]: Y
Reload privilege tables now? [Y/n]: Y

All done!
Erstellen der Datenbank & einrichten von Nextcloud
Datenbank Konfigurieren
Once MariaDB is installed, login to the database server as user root, and create database and user for Nextcloud:
# mysql -u root --password=$(cat /root/.mariadb-root-pw)
MariaDB [(none)]> CREATE DATABASE nextcloud;
MariaDB [(none)]> GRANT ALL PRIVILEGES ON nextcloud.* TO 'nextcloudusr'@'localhost' IDENTIFIED BY 'my_application_password';
MariaDB [(none)]> FLUSH PRIVILEGES;
MariaDB [(none)]> quit
Installationsanleitung von phpMyAdmin:
Download der neusten Nextcloud Version
# cd /var/www/html
# curl -o nextcloud-latest.tar.bz2 https://download.nextcloud.com/server/releases/latest.tar.bz2
# tar -jxvf nextcloud-latest.tar.bz2
# rm -f nextcloud-latest.tar.bz2

# chown -R apache:apache /var/www/html/
Einrichtung der NFS Daten Anbindung (Falls erwünscht)
Vorbereitung zum erstellen des Mountpoints unter “/mnt/blackSTORAGE” und Installation des NFS Client Tools.
# mkdir /mnt/blackSTORAGE

# yum install nfs-utils -y
# systemctl enable rpcbind --now
Einrichten des Automatischen-Einbindens des NFS Shares beim Boot.
# vim /etc/fstab
# /etc/fstab
# Created by anaconda on Tue Jan  9 21:23:03 2018
#
# Accessible filesystems, by reference, are maintained under '/dev/disk'
# See man pages fstab(5), findfs(8), mount(8) and/or blkid(8) for more info
#
/dev/mapper/centos_rhnc01-root /                       xfs     defaults        0 0
UUID=d833479c-d75d-44d7-93da-7d92a5ed70d3 /boot                   xfs     defaults        0 0
UUID=4A51-DB0E          /boot/efi               vfat    umask=0077,shortname=winnt 0 0
/dev/mapper/centos_rhnc01-swap swap                    swap    defaults        0 0

10.0.0.22:/volume1/znextcloud_files /mnt/blackSTORAGE nfs rw,hard,intr 0 0
Mounten und testen des fstab Eintrages:
# mount -a
# df -h

# chown -R apache: /mnt/blackSTORAGE
# chmod 775 /mnt/blackSTORAGE
SELinux und Firewalld Konfiguration
SELinux Rules
ACHTUNG: Wenn eine minimal-Installation durchgeführt wurde, so muss das semanage Binary mit folgendem Packet noch installiert werden: “policycoreutils-python.x86_64”
# semanage fcontext -a -t httpd_sys_rw_content_t '/var/www/html/nextcloud/3rdparty(/.*)?'
# semanage fcontext -a -t httpd_sys_rw_content_t '/var/www/html/nextcloud/data(/.*)?'
# semanage fcontext -a -t httpd_sys_rw_content_t '/var/www/html/nextcloud/config(/.*)?'
# semanage fcontext -a -t httpd_sys_rw_content_t '/var/www/html/nextcloud/apps(/.*)?'
# semanage fcontext -a -t httpd_sys_rw_content_t '/var/www/html/nextcloud/.htaccess'
# semanage fcontext -a -t httpd_sys_rw_content_t '/var/www/html/nextcloud/.user.ini'

# restorecon -Rv '/var/www/html/nextcloud/'
# getsebool -a | grep httpd

# setsebool -P httpd_can_network_connect_db on
# setsebool -P httpd_execmem 1                 ->   Erlaubt httpd Zugriff auf den PHP cache!
# setsebool -P httpd_use_nfs on                ->   Wenn die Daten-Files auf einem NFS-Share liegen.
# setsebool -P daemons_enable_cluster_mode 1   ->   Wenn ein lokaler REDIS via Unix-Socket gebraucht wird!
# setsebool -P httpd_can_sendmail on           ->   Um Emails aus Nextcloud heraus senden zu können!
# setsebool -P httpd_can_network_connect on    ->   Wird gebraucht, dass CURL in PHP funktioniert!!
# setsebool -P domain_can_mmap_files 1         ->   Für neue Collabora_Onlin version
# setsebool -P httpd_use_fusefs on             ->   aktivieren! Für neue Collabora_Onlin version und anderes...
ACHTUNG: Wird Nextcloud 18 mit aktifer OnlyOffice Integration installiert, muss zwingend folgende SELinux Rule hinzugefügt werden
# semanage fcontext -a -t httpd_sys_script_exec_t '/var/www/html/nextcloud/apps/documentserver_community/3rdparty/onlyoffice/documentserver/server/FileConverter/bin/x2t'
Ab Nextcloud 19:
# semanage fcontext -a -t httpd_sys_script_exec_t '/var/www/html/nextcloud/apps/richdocumentscode/collabora/Collabora_Online.AppImage'
Firewall rules for needed ports:
# firewall-cmd --permanent --zone=public --add-service=http
# firewall-cmd --permanent --zone=public --add-port=81/tcp

# firewall-cmd --reload
Fertigstellen der Nextcloud Installation
Starten der Services
# systemctl enable php-fpm.service --now
# systemctl enable httpd --now

# systemctl status httpd php-fpm
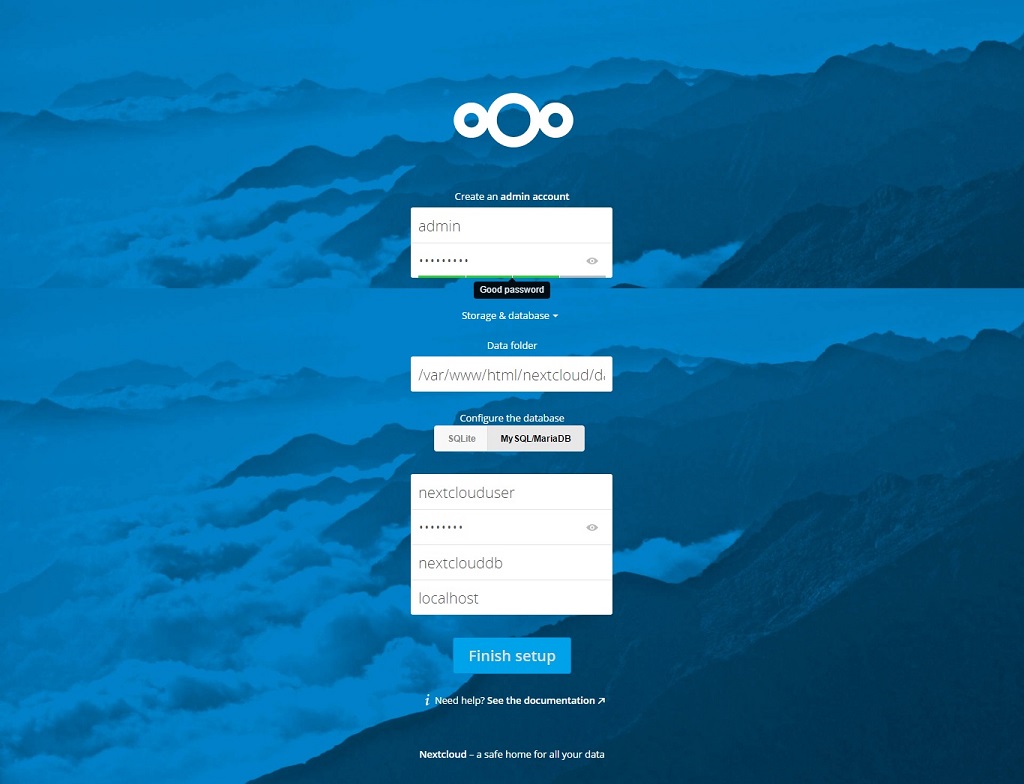
Setup Nextcloud over Web-Frontend
Finally, access Nextcloud at http://yourIP/nextcloud . The installation wizard will check if all requirements and if everything is OK, you will be prompted to create your admin user and select storage and database. Select MySQL/MariaDB as database and enter the details for the database we created earlier in this post:
Database user: nextcloudusr
Database password: my_application_password
Database name: nextcloud
host: localhost
Setzen von spezifischen Nextcloud Einstellungen im Config File:
# vim /var/www/html/nextcloud/config/config.php
<?php
$CONFIG = array (
  'instanceid' => 'ocgj4grca0co',
  'passwordsalt' => 'MY_PASSWORD_SALT',
  'secret' => '+M76xDjhgB9Cykj90hj35xzryb87u/qnvz9dg1OQKPkigzuk+/9e3',
  'trusted_domains' =>
  array (
    0 => '172.168.0.13',
    1 => 'cloud.blackgate.org',
  ),
  'datadirectory' => '/mnt/blackSTORAGE',
  'overwrite.cli.url' => 'https://cloud.blackgate.org',
  'htaccess.RewriteBase' => '/',
  'dbtype' => 'mysql',
  'version' => '17.0.8.2',
  'dbname' => 'nextcloud_db',
  'dbhost' => 'localhost',
  'dbport' => '',
  'dbtableprefix' => 'oc_',
  'dbuser' => 'michael',
  'dbpassword' => 'MDRiMGMFSFtt5çTYyNzJlZRTZ6WZj',
  'installed' => true,
  'memcache.local' => '\OC\Memcache\Redis',
  'memcache.distributed' => '\OC\Memcache\Redis',
  'memcache.locking' => '\OC\Memcache\Redis',
  'filelocking.enabled' => 'true',
  'redis' =>
  array (
    'host' => '/var/run/redis/redis.sock',
    'port' => 0,
    'timeout' => 0.0,
  ),
  'updater.release.channel' => 'production',
  'mail_smtpmode' => 'smtp',
  'mail_smtpauthtype' => 'LOGIN',
  'mail_smtpauth' => 1,
  'mail_smtphost' => 'smtp.gmail.com',
  'mail_smtpport' => '465',
  'mail_from_address' => 'mail.blackgate',
  'mail_domain' => 'gmail.com',
  'mail_smtpname' => 'mail.blackgate@gmail.com',
  'mail_smtppassword' => 'MY_MAIL_PASSWORD',
  'mail_smtpsecure' => 'ssl',
  'trusted_proxies' =>
  array (
    0 => '172.168.0.1',
  ),
  'overwritehost' => 'cloud.blackgate.org',
  'overwriteprotocol' => 'https',
  'overwritecondaddr' => '^172\\.168\\.0\\.1$',
  'maintenance' => false,
  'loglevel' => 1,
  'theme' => '',
);
Automatische Anpassung entsprechend der gemachten Konfiguration für die .htaccess Datei durchführen.
# sudo -u apache php /var/www/html/nextcloud/occ maintenance:update:htaccess
Install Caching Deps:
# yum install redis php-pecl-redis5 php-pecl-apcu php-phpiredis -y

# sed -i "s/port 6379/port 0/" /etc/redis.conf
# sed -i "s/# unixsocket \/tmp\/redis.sock/unixsocket \/var\/run\/redis\/redis.sock/" /etc/redis.conf

  (ACHTUNG: Der Ordner im Verzeichnis /var/run/REDIS wird automatisch angelegt!)

# sed -i "s/# unixsocketperm .*/unixsocketperm 770/" /etc/redis.conf
# usermod -a -G redis apache

# systemctl enable redis --now
# systemctl restart httpd

# redis-cli -s /var/run/redis/redis.sock ping      #(test redis-socket)
Erstellen des Nextcloud Cronjobs:
# vim /etc/crontab
SHELL=/bin/bash
PATH=/sbin:/bin:/usr/sbin:/usr/bin
MAILTO=root

# For details see man 4 crontabs

# Example of job definition:
# .---------------- minute (0 - 59)
# |  .------------- hour (0 - 23)
# |  |  .---------- day of month (1 - 31)
# |  |  |  .------- month (1 - 12) OR jan,feb,mar,apr ...
# |  |  |  |  .---- day of week (0 - 6) (Sunday=0 or 7) OR sun,mon,tue,wed,thu,fri,sat
# |  |  |  |  |
# *  *  *  *  * user-name  command to be executed
*/5 *  *  *  *  apache  /usr/bin/php -f /var/www/html/nextcloud/cron.php > /dev/null 2>&1
Weitere Themen bezüglich Nextcloud
SELinux - Nextcloud Upgrades via web Interface
To enable updates via the web interface, you may need this to enable writing to the directories:
# setsebool -P httpd_unified on
When the update is completed, disable write access with:
# setsebool -P httpd_unified off
Migrate Uploaded Data only for users:
Setup new Nextcloud completly!Recreate all Users over the WebGUI and make their Settings!Copy files from old Nextcloud-Server with Rsync with the option “-av” to the new instance!After copy is complete, rescan all files with the following command:# sudo -u apache php /var/www/html/nextcloud/occ files:scan --all
As last step: Set again the old users Passworts, in Table “oc_users” over phpMyAdmin! Achtung: copy old “passwordsalt” Value from old config.php to new config.php and save!
Hide "@eaDir" folders from WebGUI
Install “Custom CSS” appSet custom CSS code as following:tr[data-file*="@eaDir"] { display: none !important; }
Installation von Collabora:
# yum update
# yum install @container-tools -y
# setsebool -P container_manage_cgroup on    (Important to run containers as systemd service!!)

# podman pull collabora/code:latest

# vim /etc/systemd/system/collabora-container.service
[Unit]
Description=Collabora Container
After=network.target

[Service]
Type=simple
TimeoutStartSec=30s
ExecStartPre=-/usr/bin/podman rm -f "collabora-server"

ExecStart=/usr/bin/podman run --name collabora-server -p 9980:9980 -e DOMAIN=cloud.blackgate.org collabora/code

ExecReload=-/usr/bin/podman stop "collabora-server"
ExecReload=-/usr/bin/podman rm "collabora-server"
ExecStop=-/usr/bin/podman stop "collabora-server"
Restart=always
RestartSec=30

[Install]
WantedBy=multi-user.target
# systemctl daemon-reload
# systemctl enable collabora-container.service    (hier kann --now nicht genutzt werden!!)
# systemctl start collabora-container.service

# firewall-cmd --permanent --zone=public --add-port=9980/tcp
# firewall-cmd --reload

# netstat -tulpn
Reverse Proxy Beispiel für Nextcloud mit Collabora:
Der Markierte Abschnitt der Reverse Proxy Stanza, betrifft ausschliesslich Collabora. Der restliche Part ist den für Nextcloud obligatorische Teil!
#------------------------------------------------------------------------------------------------
#                                       CLOUD SERVICES
#------------------------------------------------------------------------------------------------

<VirtualHost *:443>
 ServerName cloud.blackgate.org
 #
     ServerAdmin ${blackgate_serveradmin}
     #Header set Content-Security-Policy "default-src 'self';"
     Header always set Strict-Transport-Security "max-age=63072000; includeSubdomains; preload"
     SSLEngine on
     SSLCertificateFile ${blackgate_ssl_path}/cert.pem
     SSLCertificateKeyFile ${blackgate_ssl_path}/privkey.pem
     SSLCertificateChainFile ${blackgate_ssl_path}/chain.pem

     ProxyPreserveHost On

     ProxyPass /error_docs !
     ErrorDocument 503 /error_docs/ServiceUnavailable.html

     # Encoded slashes need to be allowed for Collabora
     AllowEncodedSlashes NoDecode

     # Container uses a unique non-signed certificate
     SSLProxyEngine On
     SSLProxyVerify None
     SSLProxyCheckPeerCN Off
     SSLProxyCheckPeerName Off

     # static html, js, images, etc. served from loolwsd
     # loleaflet is the client part of LibreOffice Online
     ProxyPass           /loleaflet https://172.168.0.13:9980/loleaflet retry=0
     ProxyPassReverse    /loleaflet https://172.168.0.13:9980/loleaflet
     # WOPI discovery URL
     ProxyPass           /hosting/discovery https://172.168.0.13:9980/hosting/discovery retry=0
     ProxyPassReverse    /hosting/discovery https://172.168.0.13:9980/hosting/discovery
     # Main websocket
     ProxyPassMatch "/lool/(.*)/ws$" wss://172.168.0.13:9980/lool/$1/ws nocanon
     # Admin Console websocket
     ProxyPass   /lool/adminws wss://172.168.0.13:9980/lool/adminws
     # Download as, Fullscreen presentation and Image upload operations
     ProxyPass           /lool https://172.168.0.13:9980/lool
     ProxyPassReverse    /lool https://172.168.0.13:9980/lool

     #SetEnv proxy-sendchunked 1
     ProxyPass / http://172.168.0.13/ retry=1 acquire=3000 Timeout=5400 Keepalive=On flushpackets=On
     ProxyPassReverse / http://172.168.0.13/
     <Proxy http://172.168.0.13/>
             Order deny,allow
             Allow from all
     </Proxy>
     <IfModule security2_module>
             SecAction "setvar:'tx.allowed_methods=GET HEAD OPTIONS PUT POST DELETE PROPFIND SEARCH',id:900201,phase:1,nolog,pass"
     </IfModule>
</VirtualHost>
Fertigstellen der Collabora Installation:
Installation der Nextcloud Integrations AppAktivieren und Konfigurieren wie angegeben.
Installation von ONLYOFFICE:
# yum update
# yum install @container-tools -y
# setsebool -P container_manage_cgroup on    (Important to run containers as systemd service!!)

# podman pull onlyoffice/documentserver:latest

# vim /etc/systemd/system/onlyoffice-container.service
[Unit]
Description=OnlyOffice Container
After=network.target

[Service]
Type=simple
TimeoutStartSec=30s
ExecStartPre=-/usr/bin/podman rm -f "onlyoffice-server"

ExecStart=/usr/bin/podman run --name onlyoffice-server -p 8080:80 onlyoffice/documentserver

ExecReload=-/usr/bin/podman stop "onlyoffice-server"
ExecReload=-/usr/bin/podman rm "onlyoffice-server"
ExecStop=-/usr/bin/podman stop "onlyoffice-server"
Restart=always
RestartSec=30

[Install]
WantedBy=multi-user.target
# systemctl daemon-reload
# systemctl enable onlyoffice-container.service    (hier kann --now nicht genutzt werden!!)
# systemctl start onlyoffice-container.service

# firewall-cmd --permanent --zone=public --add-port=8080/tcp
# firewall-cmd --reload

# netstat -tulpn
Reverse Proxy Beispiel für Nextcloud mit ONLYOFFICE:
Der Markierte Abschnitt der Reverse Proxy Stanza, betrifft ausschliesslich ONLYOFFICE. Der restliche Part ist den für Nextcloud obligatorische Teil!
#------------------------------------------------------------------------------------------------
#                                       CLOUD SERVICES
#------------------------------------------------------------------------------------------------

<VirtualHost *:443>
 ServerName cloud.blackgate.org
 #
     ServerAdmin ${blackgate_serveradmin}
     #Header set Content-Security-Policy "default-src 'self';"
     Header always set Strict-Transport-Security "max-age=63072000; includeSubdomains; preload"
     SSLEngine on
     SSLCertificateFile ${blackgate_ssl_path}/cert.pem
     SSLCertificateKeyFile ${blackgate_ssl_path}/privkey.pem
     SSLCertificateChainFile ${blackgate_ssl_path}/chain.pem

     ProxyPreserveHost On

     ProxyPass /error_docs !
     ErrorDocument 503 /error_docs/ServiceUnavailable.html

     <Location /onlyoffice>
             Require all granted
             SetEnvIf Host "^(.*)$" THE_HOST=$1
             RequestHeader setifempty X-Forwarded-Proto https
             RequestHeader setifempty X-Forwarded-Host %{THE_HOST}e
             RequestHeader edit X-Forwarded-Host (.*) $1/onlyoffice
             ProxyAddHeaders Off
     </Location>

     ProxyPassMatch ^\/onlyoffice(.*)(\/websocket)$ "ws://172.168.0.13:8080/$1$2"
     ProxyPass /onlyoffice "http://172.168.0.13:8080"
     ProxyPassReverse /onlyoffice "http://172.168.0.13:8080"

     #SetEnv proxy-sendchunked 1
     ProxyPass / http://172.168.0.13/ retry=1 acquire=3000 Timeout=5400 Keepalive=On flushpackets=On
     ProxyPassReverse / http://172.168.0.13/
     <Proxy http://172.168.0.13/>
             Order deny,allow
             Allow from all
     </Proxy>
     <IfModule security2_module>
             SecAction "setvar:'tx.allowed_methods=GET HEAD OPTIONS PUT POST DELETE PROPFIND SEARCH',id:900201,phase:1,nolog,pass"
     </IfModule>
</VirtualHost>
Fertigstellen der ONLYOFFICE Installation:
Installation der Nextcloud Integrations AppAktivieren und Konfigurieren wie angegeben.