WireGuard VPN Setup
WireGuard is an extremely simple yet fast and modern VPN that utilizes state-of-the-art cryptography. It aims to be faster, simpler, leaner, and more useful than IPSec, while avoiding the massive headache. It intends to be considerably more performant than OpenVPN.
![]()
WireGuard is designed as a general purpose VPN for running on embedded interfaces and super computers alike, fit for many different circumstances. Initially released for the Linux kernel, it is now cross-platform and widely deployable.
Install VPN-Server on CentOS 7 / 8
For the Debian installation Tutorial klick here
Ausgangslage:
LAN Network=192.168.1.0/24
VPN Network=192.168.100.0/24VPN Port=53666/UDP
For CentOS 7 ONLY:
# yum install epel-release
# curl -Lo /etc/yum.repos.d/wireguard.repo https://copr.fedorainfracloud.org/coprs/jdoss/wireguard/repo/epel-7/jdoss-wireguard-epel-7.repo
# yum update

# yum install wireguard-dkms wireguard-tools
For CentOS 8 ONLY:
# yum install epel-release
# yum config-manager --set-enabled PowerTools
# yum copr enable jdoss/wireguard

# yum install wireguard-dkms wireguard-tools
continue here:
# mkdir /etc/wireguard && cd /etc/wireguard/

# umask 077
# wg genkey > wg0.conf
# vim /etc/wireguard/wg0.conf
[Interface]
Address = 192.168.100.1/24
SaveConfig = true
PostUp = iptables -I FORWARD -i wg0 -j ACCEPT; iptables -I FORWARD -o wg0 -j ACCEPT
PostDown = firewall-cmd --reload
ListenPort = 53666
PrivateKey = INVH3hPTDtaQVB7TkGy/qLMeEgbiiUjV2PbPF0B4+ns=
# firewall-cmd --zone=public --add-port=53666/udp --permanent
# firewall-cmd --reload

# sysctl net.ipv4.ip_forward=1
# echo "net.ipv4.ip_forward=1" >> /etc/sysctl.d/99-sysctl.conf
# echo "net.ipv4.conf.all.forwarding=1" >> /etc/sysctl.d/99-sysctl.conf
# echo "net.ipv6.conf.all.forwarding=1" >> /etc/sysctl.d/99-sysctl.conf

# cat /etc/sysctl.d/99-sysctl.conf
# sysctl settings are defined through files in
# /usr/lib/sysctl.d/, /run/sysctl.d/, and /etc/sysctl.d/.
#
# Vendors settings live in /usr/lib/sysctl.d/.
# To override a whole file, create a new file with the same in
# /etc/sysctl.d/ and put new settings there. To override
# only specific settings, add a file with a lexically later
# name in /etc/sysctl.d/ and put new settings there.
#
# For more information, see sysctl.conf(5) and sysctl.d(5).
net.ipv4.ip_forward=1
net.ipv4.conf.all.forwarding=1
net.ipv6.conf.all.forwarding=1
# sysctl -p
# systemctl start wg-quick@wg0.service
# systemctl enable wg-quick@wg0.service
Setup POSTROUTING, do this ONLY if you don't want to setup routing!
# firewall-cmd --permanent --direct --add-rule ipv4 nat POSTROUTING 0 -s 192.168.100.0/24 ! -d 192.168.100.0/24 -j SNAT --to 192.168.1.8
# firewall-cmd --reload
# wg
interface: wg0
  public key: g5C+DlBfxAzk+QHU6wSDC9PGKoSHTf5j9NC9fBQcrks=
  private key: (hidden)
  listening port: 53666
Setup Router Settings
Fritzbox - Port Forwarding Konfigurieren
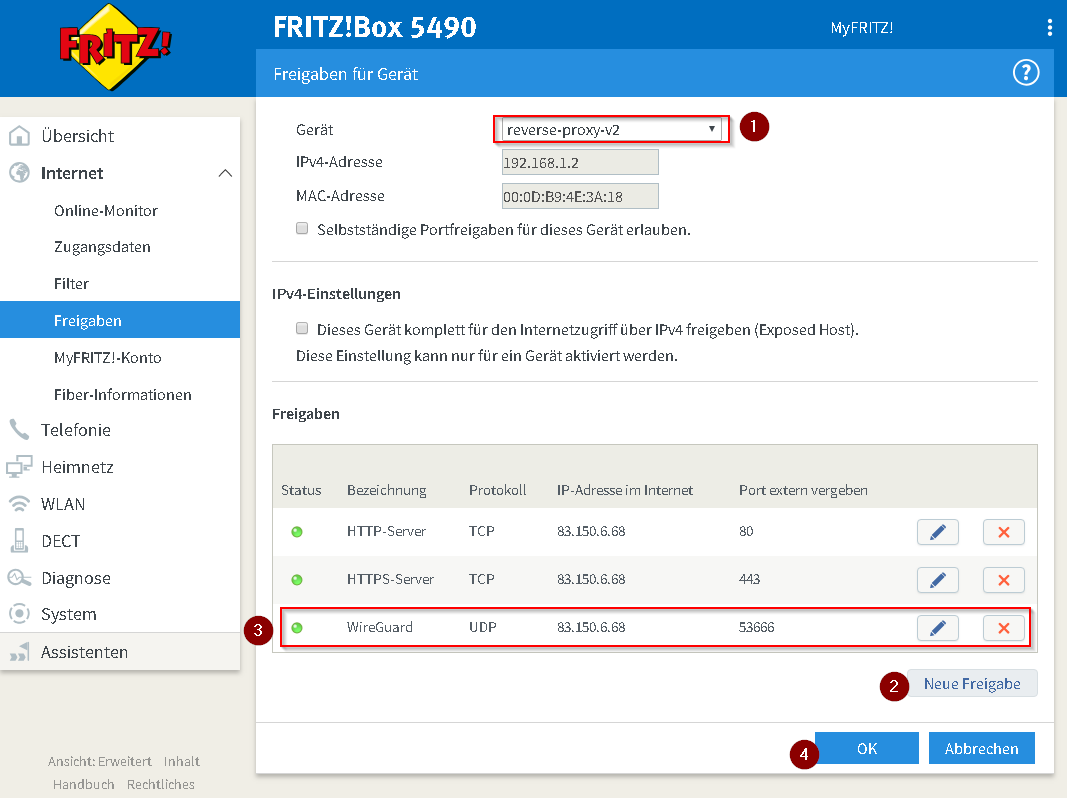
Vorgehen:
Unter: “Internet” → “Freigaben” → “Freigaben für Gerät hinzufügen”
Auswählen des Gerätes auf welchem der VPN-Server installiert wurdeNeue FreigabeNeuer Service - WireGuard Port 3x hinterlegen UDP und Service hinzufügenBestätigen und speichern
Fritzbox - Routing Konfigurieren
Nur falls kein POSTROUTING als Interface Forewarding eingesetzt wird. (So wie in diesem Tutorial)
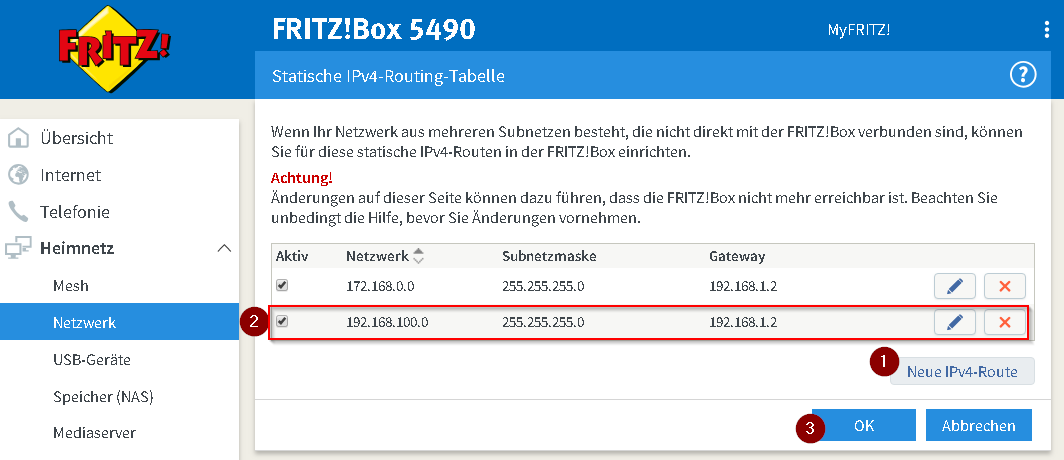
Vorgehen:
Unter: “Heimnetzwerk” → “Netzwerk” → “Statische IPv4 Routing-Tabelle bearbeiten”
Neue IPv4-RouteErstellen von LAN Routing in VPN Netzwerk (192.168.100.X) - Der Gateway ist hierbei die LAN IP des Servers auf welchem WireGuard installiert ist.Bestätigen und speichern
Connect Android Smartpone with VPN
- Install WireGuard App on Smartphone:
- Create new WireGuard Tunnel:
- Generate Private-Key and Public-Key for Smartphone:
- Add static IP Adress and DNS to Smartphone VPN connection:
- Stop Server and add Client VPN Peer (Client-Public-Key) to Server:
Edit VPN configuration-file on Server:# systemctl stop wg-quick@wg0.service # vim /etc/wireguard/wg0.conf
[Interface]
Address = 192.168.100.1/24
SaveConfig = true
PostUp = iptables -I FORWARD -i wg0 -j ACCEPT; iptables -I FORWARD -o wg0 -j ACCEPT
PostDown = firewall-cmd --reload
ListenPort = 53666
PrivateKey = INVH3hPTDtaQVB7TkGy/qLMeEgbiiUjV2PbPF0B4+ns=

[Peer]
PublicKey = 9RaYFNNWSk/l6uU3so44XqXErW5en2q74BsSayyEBlA=
AllowedIPs = 192.168.100.10/32
Restart VPN connection deamon:# systemctl start wg-quick@wg0.service
Print WireGuard information:# wg
interface: wg0
  public key: g5C+DlBfxAzk+QHU6wSDC9PGKoSHTf5j9NC9fBQcrks=
  private key: (hidden)
  listening port: 53666

peer: 9RaYFNNWSk/l6uU3so44XqXErW5en2q74BsSayyEBlA=
  allowed ips: 192.168.100.10/32
- Add Server VPN Peer (Server-Public-Key) on Client:
- Connect & Test:
Connect Windows PC with VPN
- Install WireGuard App on Computer:
TO DO
- Create new WireGuard Tunnel:
- Generate Private-Key and Public-Key for Smartphone:
- Add static IP Adress and DNS to Smartphone VPN connection:
- Stop Server and add Client VPN Peer (Client-Public-Key) to Server:
Edit VPN configuration-file:# systemctl stop wg-quick@wg0.service # vim /etc/wireguard/wg0.conf
[Interface]
Address = 192.168.100.1/24
SaveConfig = true
PostUp = iptables -I FORWARD -i wg0 -j ACCEPT; iptables -I FORWARD -o wg0 -j ACCEPT
PostDown = firewall-cmd --reload
ListenPort = 53666
PrivateKey = INVH3hPTDtaQVB7TkGy/qLMeEgbiiUjV2PbPF0B4+ns=

[Peer]
PublicKey = 9RaYFNNWSk/l6uU3so44XqXErW5en2q74BsSayyEBlA=
AllowedIPs = 192.168.100.10/32
Restart VPN connection deamon:# systemctl start wg-quick@wg0.service
Print WireGuard information:# wg
interface: wg0
  public key: g5C+DlBfxAzk+QHU6wSDC9PGKoSHTf5j9NC9fBQcrks=
  private key: (hidden)
  listening port: 53666

peer: 9RaYFNNWSk/l6uU3so44XqXErW5en2q74BsSayyEBlA=
  allowed ips: 192.168.100.10/32
- Add Server VPN Peer (Server-Public-Key) on Client:
- Connect & Test: