Configure an iSCSI Target / Initiator on Redhat 7
With an iSCSI target we can provide access to disk storage on a server over the network to a client iSCSI initiator. The iSCSI initiator will then be able to use the storage from the iSCSI target server as if it were a local disk.
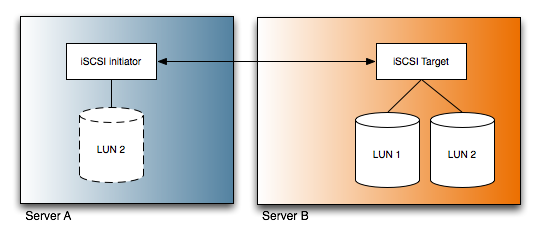
Here we cover how you can set up both an iSCSI target and an iSCSI initiator in Linux and connect them together.
System Umgebungen
We will be working with two different Linux servers, both of which are running CentOS 7.
Client: 192.168.1.100: This Linux system acts as the iSCSI initiator, it will connect to the iSCSI target on the server over the network.Server: 192.168.1.200: This Linux system acts as the iSCSI target server, it provides the disk space that will be accessible over the network to the client.
Konfiguration iSCSI Target (Server)
Installation des Packets
First we’ll start by configuring the iSCSI target on our server, which will be offering its disk space over the network to our client which is the iSCSI initiator.
We want to install the ‘targetcli’ package on the server, this provides a shell for viewing and modifying the target configuration so that we can export local storage resources such as files, volumes or RAM disks to external systems. The layout is tree based and navigation works in a similar way to moving through the file system with commands such as ‘cd’ and ‘ls’ available.
# yum install targetcli -y
Once installed we want to start the target service, and enable it so that it automatically starts up on system boot.
# systemctl start target
# systemctl enable target
For further information on basic service management with systemctl, see our guide here.
Creating a Backstore
Now we can run the targetcli command, followed by ls from within the targetcli prompt to get an idea of what is available.
# targetcli
Warning: Could not load preferences file /root/.targetcli/prefs.bin.
targetcli shell version 2.1.fb41
Copyright 2011-2013 by Datera, Inc and others.
For help on commands, type 'help'.

/> ls
o- / .................................... [...]
  o- backstores ......................... [...]
  | o- block ............. [Storage Objects: 0]
  | o- fileio ............ [Storage Objects: 0]
  | o- pscsi ............. [Storage Objects: 0]
  | o- ramdisk ........... [Storage Objects: 0]
  o- iscsi ....................... [Targets: 0]
  o- loopback .................... [Targets: 0]
The targetcli command offers tab completion, so if you get stuck just press tab a couple of times to view available options. These will change depending on what level of the hierarchy you are in, and just like the file system you can always go up with 'cd ..'.
The first thing listed are the backstores. Backstores provide different ways of storing the data locally that will be exported to an external system. The available options are block, fileio, pscsi and ramdisk. In our example we’ll be demonstrating both block and fileio options as these are quite common.
- A block backstore is simply a Linux block device such as a hard drive like /dev/sdc.
- A fileio backstore is a file on the file system that has been created with a predefined size, generally the performance of a single file is not as good as a block backstore.
To create a backstore, type the backstores command followed by the type that you want to create, such as fileio. If you get stuck put the tab completion to work.
Here we are creating the testfile fileio backstore, this will make a 500MB /tmp/fileio file on disk, where write_back=false simply says to not use any caching which will decrease performance but will reduce possible data loss – a better option in a production environment.
Create backstore with fileio-file:/> backstores/fileio create testfile /tmp/fileio 500M write_back=false
Created fileio testfile with size 524288000
If you’re using a block device rather than a file, the command would look like this. In this example we are using the disk /dev/sdc as our backstore.
Create backstore with block-device:/> backstores/block create name=block dev=/dev/sdc
Created block storage object block using /dev/sdc.
Once complete if you issue the 'ls' command again and the backstores should be listed.
/> ls
o- / ...................................................... [...]
  o- backstores ........................................... [...]
  | o- block ............................... [Storage Objects: 1]
  | | o- block ....... [/dev/sdc (1.0GiB) write-thru deactivated]
  | o- fileio .............................. [Storage Objects: 1]
  | | o- testfile .. [/tmp/fileio (500.0MiB) write-thru deactivated]
  | o- pscsi ............................... [Storage Objects: 0]
  | o- ramdisk ............................. [Storage Objects: 0]
  o- iscsi ......................................... [Targets: 0]
  o- loopback ...................................... [Targets: 0]
Create the iSCSI Target and Portal
Next we want to create the actual iSCSI target itself, start by moving into the iSCSI path as shown below. You don’t need to prepend the 'cd' command to access it, however that works as well.
/> iscsi/
Once in here, we can create the iSCSI target with a specific IQN (iqn.2017-09.com.example) and iSCSI target name (target).
/iscsi> create iqn.2016-01.com.example:target
Created target iqn.2016-01.com.example:target.
Created TPG 1.
Global pref auto_add_default_portal=true
Created default portal listening on all IPs (0.0.0.0), port 3260.
Alternatively you can just enter 'create' by itself and it will automatically use a default IQN and target name, you don’t have to manually pick these however the option is nice.
Now if we run ls' again we should see our iSCSI target listed.
/iscsi> ls
o- iscsi ............................. [Targets: 1]
  o- iqn.2016-01.com.example:target ..... [TPGs: 1]
    o- tpg1 ................ [no-gen-acls, no-auth]
      o- acls ........................... [ACLs: 0]
      o- luns ........................... [LUNs: 0]
      o- portals ..................... [Portals: 1]
        o- 0.0.0.0:3260 ...................... [OK]
As we can see here, a portal has already been created. As of RHEL 7.1 once a target has been set, a default portal will also be configured which will listen on TCP port 3260 on 0.0.0.0.
Create a LUN
Next we want to make a LUN with our previously defined backstore.
First move into the target portal group (TPG) that was just created.
/iscsi> iqn.2016-01.com.example:target/tpg1/
After this we can create the LUN, specifying any backstore that we have previously created. By default a LUN created in this way will have read-write permissions applied. Here we create a LUN for both our fileio and block backstores.
Create LUN for fileio:/iscsi/iqn.20...e:target/tpg1> luns/ create /backstores/fileio/testfile
Created LUN 0.
Create LUN for block-device:/iscsi/iqn.20...e:target/tpg1> luns/ create /backstores/block/block
Created LUN 1.
Now if we execute 'ls' we should see both of our LUNs present.
/iscsi/iqn.20...e:target/tpg1> ls
o- tpg1 .................... [no-gen-acls, no-auth]
  o- acls ............................... [ACLs: 0]
  o- luns ............................... [LUNs: 2]
  | o- lun0 ....... [fileio/testfile (/tmp/fileio)]
  | o- lun1 .............. [block/block (/dev/sdc)]
  o- portals ......................... [Portals: 1]
    o- 0.0.0.0:3260 .......................... [OK]
Create an ACL
Now we need to configure an access control list (ACL) to define the initiators that are actually allowed to connect to the iSCSI target.
To do this, go to the client system that will be our iSCSI initiator and get the contents of the /etc/iscsi/initiatorname.iscsi file – you can edit this file if you want, otherwise the default is fine. This will work as long as what we configure in our ACL on the iSCSI target server is the same as the contents of this file on the iSCSI initiator client.
Execute on the Client Computer ONLY:
[root@client-machine ~]# cat /etc/iscsi/initiatorname.iscsi
InitiatorName=iqn.1994-05.com.redhat:5bf95f78165
Now that we have the name of our initiator from the client system, we enter the ACL section on the server within the TPG.
/iscsi/iqn.20...e:target/tpg1> acls/
Now create the ACL by specifying the initiator name found on the client system.
/iscsi/iqn.20...get/tpg1/acls> create iqn.1994-05.com.redhat:5bf95f78165
Created Node ACL for iqn.1994-05.com.redhat:5bf95f78165
Created mapped LUN 1.
Created mapped LUN 0.
Note that all LUNs that have been created within this iSCSI target will automatically be mapped to the ACL.
/iscsi/iqn.20...get/tpg1/acls> ls
o- acls ........................................ [ACLs: 1]
  o- iqn.1994-05.com.redhat:5bf95f78165 ..[Mapped LUNs: 2]
    o- mapped_lun0 .............. [lun0 fileio/file1 (rw)]
    o- mapped_lun1 ............... [lun1 block/block (rw)]
That’s all of the configuration required, we can use ‘cd’ to go up to the root of the iSCSI target and then use ‘ls’ to view all of the configuration.
/iscsi/iqn.20...get/tpg1/acls> cd ../..

/iscsi/iqn.20...xample:target> ls
o- iqn.2016-01.com.example:target .......................... [TPGs: 1]
  o- tpg1 ..................................... [no-gen-acls, no-auth]
    o- acls ................................................ [ACLs: 1]
    | o- iqn.1994-05.com.redhat:5bf95f78165 ......... [Mapped LUNs: 2]
    |   o- mapped_lun0 ................... [lun0 fileio/testfile (rw)]
    |   o- mapped_lun1 ....................... [lun1 block/block (rw)]
    o- luns ................................................ [LUNs: 2]
    | o- lun0 ........................ [fileio/testfile (/tmp/fileio)]
    | o- lun1 ............................... [block/block (/dev/sdc)]
    o- portals .......................................... [Portals: 1]
      o- 0.0.0.0:3260 ........................................... [OK]
Saving Changes
To save the configuration, simply exit and this will write everything to the /etc/target/saveconfig.json file as shown below.
/iscsi/iqn.20...xample:target> exit
Global pref auto_save_on_exit=true
Last 10 configs saved in /etc/target/backup.
Configuration saved to /etc/target/saveconfig.json
iSCSI Firewall Rules
Once complete the target server should now be listening on TCP port 3260 as shown below.
# netstat -antup | grep 3260
tcp        0      0 0.0.0.0:3260            0.0.0.0:*               LISTEN      -
Now we need to allow traffic through firewalld on this port.
# firewall-cmd --permanent --add-port=3260/tcp
# firewall-cmd --reload
Our iSCSI target is now ready to accept connections from the iSCSI initiator on our client system (iqn.1994-05.com.redhat:5bf95f78165).
Konfiguration iSCSI Initiator (Client)
Now that the iSCSI target has been configured and setup, we can proceed with configuring the iSCSI initiator on the client side to connect to the iSCSI target.
If you need to configure the Initiator for Windows, click the Link below:
The initiator will need the iscsi-initiator-utils package to be installed prior to connecting, install it first as shown below.
# yum install iscsi-initiator-utils -y

https://www.rootusers.com/how-to-configure-an-iscsi-target-and-initiator-in-linux/